Vault Installation to Minikube via Helm with Integrated Storage
In this tutorial, I will set up Vault and its dependencies with a Helm chart. I will then integrate a web application that uses the Kubernetes service account (SA) token to authenticate with Vault and retrieve a secret.
Prerequisites
- Docker
- Minikube
- Kubectl (Kubernetes Command Line Interface)
- Helm CLI (Helm Client)
- Vault and Consul Helm Charts
- Sample Web Application
Vault Installation & Configuration
- Install Vault Helm Chart
- Create a Secret Engine in Vault
- Create a secret in Secret Engine
- Configure Kubernetes Authentication
- Create a Policy
- Create a Role
Web Application Deployment
- Deploy web application
- Access web application to retrieve secret
Prerequisites
Install Docker
$ sudo apt install docker.io
OR
download from here https://docs.docker.com/desktop/install/windows-install/
Install Minikube
#Installation on Linux Machine
$ curl -LO https://storage.googleapis.com/minikube/releases/latest/minikube-linux-amd64
$ sudo install minikube-linux-amd64 /usr/local/bin/minikube#Installation on Mac OS
$ curl -LO https://storage.googleapis.com/minikube/releases/latest/minikube-darwin-amd64
$ sudo install minikube-darwin-amd64 /usr/local/bin/minikube#Start Minikube
$ minikube start --memory 8192 --cpus 4
OR
$ minikube start#Other Minikube Commands
$ minikube stop
$ minikube delete
Install Kubectl
#Download Latest Kubectl Release
$ curl -LO "https://dl.k8s.io/release/$(curl -L -s https://dl.k8s.io/release/stable.txt)/bin/darwin/amd64/kubectl"#Download kubectl Checksum file
$ curl -LO "https://dl.k8s.io/release/$(curl -L -s https://dl.k8s.io/release/stable.txt)/bin/darwin/amd64/kubectl.sha256"#Validate the kubectl binary against the checksum file
$echo "$(<kubectl.sha256)  kubectl" | shasum -a 256 --check#Make the kubectl binary executable
$ chmod +x ./kubectl#Move the kubectl binary to a file location on your system PATH
$ sudo mv ./kubectl /usr/local/bin/kubectl#Test to ensure the version you installed is up-to-date
$ kubectl version --client
Install Helm CLI
# Install Helm Client
$ cd "/temp/"
$ wget https://get.helm.sh/helm-v3.10.0-rc.1-linux-amd64.tar.gz
$ tar -xvzf helm-v3.10.0-rc.1-linux-amd64.tar.gz
$ sudo mv linux-amd64/helm /usr/local/bin/helm
$ rm -rf helm-v3.10.0-rc.1-linux-amd64.tar.gz
$ rm -rf linux-amd64
$ helm --help
Vault Installation & Configuration
Install Vault Helm Chart
For this article I will run Vault in development mode to automatically handle initialisation, unsealing, and setup of a KV secrets engine.
- Create a namespace to install vault
$ kubectl create ns vault
namespace/vault created$ kubectl get ns
NAME              STATUS   AGE
default           Active   3m13s
kube-node-lease   Active   3m15s
kube-public       Active   3m15s
kube-system       Active   3m15s
vault             Active   3s
- Add helm vault repo and Install Chart
#Add the HashiCorp Helm repository
$ helm repo add hashicorp https://helm.releases.hashicorp.com#Update all the repositories to ensure helm is aware of the latest versions
$ helm repo update#To verify, search repositories for vault in charts
$ helm search repo hashicorp/vault#Install the latest version of the Vault Helm chart with Integrated Storage
$ cat > helm-vault-raft-values.yml <<EOF
server:
  affinity: ""
  ha:
    enabled: true
    raft:
      enabled: true
EOF#Install Vault Helm Chart
$ helm install vault hashicorp/vault --values helm-vault-raft-values.yml -n vault
The output of above helm install will look like below,
NAME: vault
LAST DEPLOYED: Wed Oct 12 01:05:00 2022
NAMESPACE: vault
STATUS: deployed
REVISION: 1
NOTES:
Thank you for installing HashiCorp Vault!
Now that you have deployed Vault, you should look over the docs on using
Vault with Kubernetes available here:
https://www.vaultproject.io/docs/
Your release is named vault. To learn more about the release, try:$ helm status vault
$ helm get manifest vault
- This creates three Vault server instances with an Integrated Storage (Raft) backend.
- Display all the pods within the vault namespace.
$ kubectl get po -n vault
- Initialize
vault-0with one key share and one key threshold.
$ kubectl exec vault-0 -n vault -- vault operator init \
    -key-shares=1 \
    -key-threshold=1 \
    -format=json > cluster-keys.json$ cat cluster-keys.json

operator init command generates a root key that it disassembles into key shares -key-shares=1
-key-threshold=1then sets the number of key shares required to unseal Vault

- Create a variable named
VAULT_UNSEAL_KEYto capture the Vault unseal key
$ VAULT_UNSEAL_KEY=$(jq -r ".unseal_keys_b64[]" cluster-keys.json)- Unseal Vault running on the
vault-0pod
$ kubectl exec vault-0 -n vault -- vault operator unseal $VAULT_UNSEAL_KEY
- Join the
vault-1andvault-2pods to the Raft cluster
$ kubectl exec -ti vault-1 -n vault -- vault operator raft join http://vault-0.vault-internal:8200$ kubectl exec -ti vault-2 -n vault -- vault operator raft join http://vault-0.vault-internal:8200

- Use the unseal key from above to unseal
vault-1andvault-2
Unsealing is the process of constructing the root key necessary to read the decryption key to decrypt the data, allowing access to the Vault.
$ kubectl exec -ti vault-1 -n vault -- vault operator unseal $VAULT_UNSEAL_KEY$ kubectl exec -ti vault-2 -n vault -- vault operator unseal $VAULT_UNSEAL_KEY

- After this unsealing process all vault pods are now in running (1/1 ready ) state
$ kubectl get po -n vault
- Vault service is of ClusterIP type which means we can access Vault console from browser so to access this we need to use port-forward command
$ kubectl port-forward service/vault -n vault 8200:8200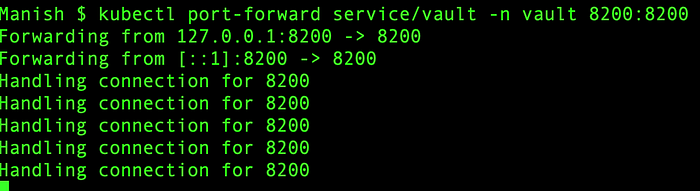
- type http://localhost:8200 in browser and enter root token

- After successful login you will see below page with default secret engine type

Create a Secret Engine in Vault
To deploy sample web application it expects Vault to store a username and password at the path secret/webapp/config . We have two options to create secrets in Vault ,
- create using vault command by logging to vault pod
- create from Vault UI console
For this article I will use 2nd option to create from UI.
- Enable Vault KV Secret Engine
After successful login to Vault UI . Click on Secrets > Enable new engine

Vault supports quite good number of Secret engines as you can see in below image. I have selected Generic KV (Key-Value) type for this article.

- You need to select few option here
Path: keep the path value to secret
Maximum number of versions: set it to 0 to keep last 10 versions of the secrets else you can set any number of your choice
Version: Set it 2.
The KV secrets engine v1 does not provide a way to version or roll back secrets. This made it difficult to recover from unintentional data loss or overwrite when more than one user is writing at the same path.
version 2 of KV secrets engine which can retain a configurable number of secret versions. This enables older versions’ data to be retrievable in case of unwanted deletion or updates of the data.
Default and Max Lease TTL: The default token TTL (default_lease_ttl) and the max TTL (max_lease_ttl) is set to 32 days (768 hours). This implies that the tokens are valid for 32 days from its creation whether an app is using the token or not.

Key-Value (KV) secret engine will get created after clicking the Enable Engine button

Create a Secret in Secret Engine
Now, next step is to create secret in this KV secret engine. I will create a secret at path secret/webapp/config with a username and password.

After you save this secret will be created with its first version. Version number will increase whenever you make any changes to this secret and can rollback to any previous version.

Configure Kubernetes Authentication
The web application only requires the ability to read secrets defined at a single path. This application should authenticate and be granted a token with limited access.
Vault provides a Kubernetes authentication method that enables clients to authenticate with a Kubernetes Service Account Token.
- Enable Authentication method
Click on Access > Auth Methods > Enable new method

- Enable the Kubernetes authentication method
Select Kubernetes from the Infra section and then click Next.
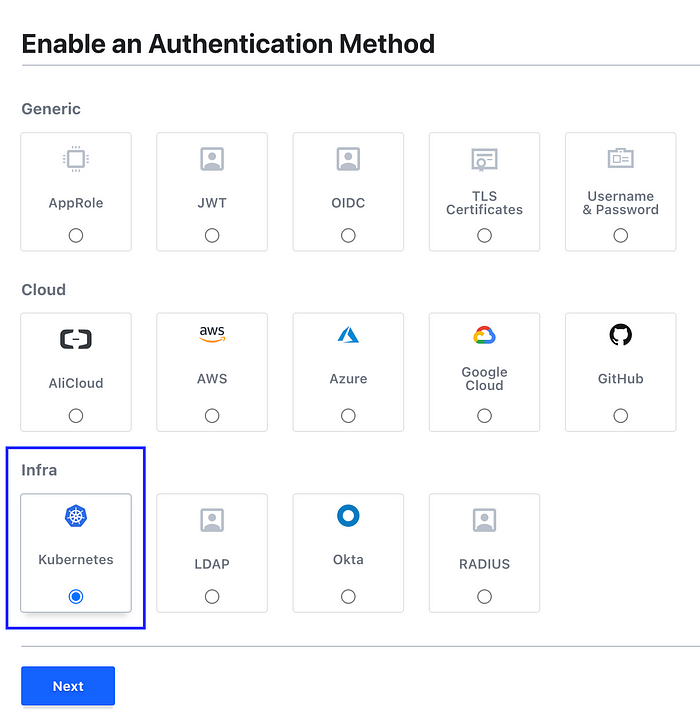
Keep the path kubernetes as-is and click on Enable Method button.

- Configure the Kubernetes authentication method to use the location of the Kubernetes API.
Vault accepts Kubernetes service token from any client within the Kubernetes cluster. During authentication, Vault verifies that the service account token is valid by querying a configured Kubernetes endpoint.
The environment variable KUBERNETES_PORT_443_TCP_ADDR is defined and references the internal network address of the Kubernetes host.

You can now see Kubernetes authentication method is created.

Create a Policy
For the web application (client) to access the secret data defined at secret/webapp/config, requires that the read capability be granted for the path secret/data/webapp/config
Click on Policies > Create ACL Policy

Give ACL policy any name that enables the read capability for secrets at path secret/data/webapp/config

Your policy will be created once you click on Create Policy and then you can see that policy in policies list

Create a Role
Define an auth method role that uses the webapp policy. A role binds policies and environment parameters together to create a login for the web application.

Click on Access > Auth Methods > Kubernetes > Create Role
This role will basically will connects the Kubernetes service account name (webapp-service-account) and webapp policy so with below commands I have created both the namespace and service account for web application.
$ kubectl create namespace webapps
namespace/webapps created$ kubectl apply -f - <<EOF
apiVersion: v1
kind: ServiceAccount
metadata:
  name: webapp-service-account
  namespace: webapps
EOF
Enter all the details as mentioned below and click Save

Now your webapp role is created to grant webapp policy (read secret) to service account webapp-service-account created in webapps namespace.

Web Application Deployment
Deploy Web Application
Create this deployment in your webapps namespace
$ kubectl apply -f - <<EOF
---
apiVersion: apps/v1
kind: Deployment
metadata:
  name: webapp
  namespace: webapps
  labels:
    app: webapp
spec:
  replicas: 1
  selector:
    matchLabels:
      app: webapp
  template:
    metadata:
      labels:
        app: webapp
    spec:
      serviceAccountName: webapp-service-account
      containers:
        - name: app
          image: burtlo/exampleapp-ruby:k8s
          imagePullPolicy: Always
          env:
            - name: VAULT_ADDR
              value: 'http://vault:8200'
            - name: JWT_PATH
              value: '/var/run/secrets/kubernetes.io/serviceaccount/token'
            - name: SERVICE_PORT
              value: '8080'
EOF
This example web application performs the single function of listening for HTTP requests. During a request it reads the Kubernetes service token, logs into Vault, and then requests the secret.
The web application deployment defines a list of environment variables.
JWT_PATHsets the path of the JSON web token (JWT) issued by Kubernetes. This token is used by the web application to authenticate with Vault.VAULT_ADDRsets the address of the Vault service (accept traffic on port 8200). The Helm chart defined a Kubernetes service namedvaultthat forwards requests to its endpoints (i.e. The pods namedvault-0,vault-1, andvault-2).SERVICE_PORTsets the port that the service listens for incoming HTTP requests.
Access Web Application Endpoint to Retrieve Secret
In another terminal, port forward all requests made to http://localhost:8080 to the webapp pod on port 8080.
$ kubectl port-forward \
 $(kubectl get pod -n webapps -l app=webapp -o jsonpath=”{.items[0].metadata.name}”) \
 8080:8080 -n webapps
So finally our sample web application running on port 8080 in the webapp pod is able to ,
- authenticates with the Kubernetes service account token
- receives a Vault token with the read capability at the
secret/data/webapp/configpath - retrieves the secrets from
secret/data/webapp/configpath - displays the secrets as JSON
Thanks for reading this article. Pls follow me if you really liked this article.
Here is am going to note down all the commands which you can use to create Secrets, Roles , policy, authentication methods instead of using Vault UI.
#Display the root token found in cluster-keys.json
$ jq -r ".root_token" cluster-keys.json#Start an interactive shell session on the vault-0 pod
$ kubectl exec --stdin=true --tty=true vault-0 -n vault -- /bin/sh
$ vault login

- Enable an instance of the kv-v2 secrets engine at the path
secret

- Create a secret at path
secret/webapp/configwith ausernameandpassword.
$ vault kv put secret/webapp/config username="static-user" password="static-password"
- Verify that the secret is defined at the path
secret/webapp/config
$ vault kv get secret/webapp/config
- Enable the Kubernetes authentication method
$ vault auth enable kubernetes
- Configure the Kubernetes authentication method to use the location of the Kubernetes API.
$ vault write auth/kubernetes/config \
    kubernetes_host="https://$KUBERNETES_PORT_443_TCP_ADDR:443"
- Write out the policy named
webappthat enables thereadcapability for secrets at pathsecret/data/webapp/config
$ vault policy write webapp - <<EOF path "secret/data/webapp/config" { capabilities = ["read"] } EOF
- Create a Kubernetes authentication role, named
webapp, that connects the Kubernetes service account name andwebapppolicy.
$ vault write auth/kubernetes/role/webapp \
        bound_service_account_names=webapp-service-account \
        bound_service_account_namespaces=webapps \
        policies=webapp \
        ttl=24h
The role connects the Kubernetes service account, vault, and namespace, default, with the Vault policy, webapp. The tokens returned after authentication are valid for 24 hours.
We have successfully created the secrets and other stuffss for the web application. Now you exit from the vault-0 container.